Tuesday, November 29, 2011

AT89s51-52 and AVR USB Downloader

Microcontroller T89s51, AT89S52 and AVR is an idol among students. Well now because of technology trends and laptop PCs already left the LPT and COM so more and more difficult to download the firmware into the microcontroller, via LPT or COM. Solutions to be overcome with AT89S S-series, because the facility program downloads with the ISP (MISO, MOSI, SCK, RST), then use the ISP downloader which is also commonly used for this AVR microcontroller type. Time to play man with AT89s so much easier via USB without hassle and unplug the IC.
AT89s51-52 and AVR
USB Downloader Circuit

After you finish creating the PCB from the circuit above, then fill it to the ATmega8 with firmware usb51.hex do not forget to set low fuse = EF (SUT0 = 0, others = 1) and high fuse = C9 (SPIEN = 0, CKOPT = 0, BOOTSZ1 = 0, BOOTSZ0 = 0, others = 1). Of course, charging into the ATmega8, firmware downloader tool is needed.

For those who need a filling firmware and more complete information about the USB Downloader please visit http://guru.technosains.com/

Wednesday, November 16, 2011

Rangkaian Pendeteksi Angin

This circuit uses an incandescent lamp to detect airflow (mendeteksi angin). With the filament exposed to air, a constant current source is used to slightly heat the filament. As it is heated, the resistance increases. As air flows over the filament it cools down, thus lowering it's resistance. A comparator is used to detect this difference and light an LED. With a few changes, the circuit can be connected to a meter or ADC to provide an estimation on the amount of air flow. 
Rangkaian Pendeteksi Angin
LM339 Pinout
The glass will have to be removed from L1 without breaking the filament. Wrap the glass in masking tape and it in a vise. Slowly crank down until the glass breaks, then remove the bulb and carefully peel back the tape. If the filament has broken, you will need another lamp.

List Component
R1   : 100 Ohm 1/4W Resistor 
R2   : 470 Ohm 1/4W Resistor 
R3   : 10k 1/4W Resistor 
R4   : 100K 1/4W Resistor 
R5   : 1K 1/4W Resistor 
C1   : 47uF Electrolytic Capacitor 
U1   : 78L05 Voltage Regulator 
U2   : LM339 Op Amp 
L1   : #47 Incandescent lamp with glass removed (See "Notes") 
D1   : LED 

Stepper Motor Controller using IC 4027

The stepper controller circuit is very interesting, since most lines the step motor controllers are very expensive. The circuit is made ​​of standard components and can easily be adjusted by a computer. If you cheap surplus transistors and stepper motors, the price of the circuit can be less than $ 15.
Stepper Motor Controller Circuit using IC 4027
This stepper controller circuit shown here can used to control the unipolar stepper motor, the which has four coils. The stepper controller circuit can drive for a motor current of up to about 500 MAMP / Winding by Suitable heat sinks for the SL-100 In higher currents seem 2N3055 power transistors can be used as darlington pair along with the SL-100. All diodes are used to protect the transistor from back current transients.

List Componet
R1, R2 ,R3, R4: 1K 1/4W Resistor
D1, D2, D3, D4: 1N4002 Silicon Diode
Q1, Q2, Q3, Q4: TIP31 NPN Transistor (See Notes) TIP41, 2N3055
U1            : 4070 CMOS XOR
U2            : 4027 CMOS JK Flip-Flop
S1            : SPDT Switch
 
Notes: 
1. You should be able to substitute any standard (2N3055, etc.) power transistor for Q1-Q4.
2. Every time the STEP line is pulsed, the motor moves one step.
3. S1 changes the motors direction.
4027 CMOS JK Flip-Flop IC  Pinout
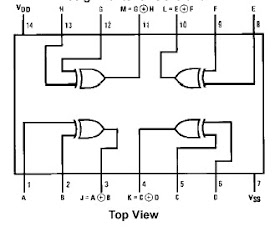
4070 CMOS XOR IC Pinout