Tuesday, January 26, 2010

Rangkaian Kristal Tester

Kristal Tester

In the world of electronics using crystal oscilator almost always in use. In the circuit below is a series to test the crystal. (Not measuring frequensy). With this circuit we could find out whether the crystal is still good or not. Test Clip to attach electrodes on crystal (foot), S1 in the press (On) then LED1 will light up if the crystal is still good. if you mendapa difficulties 2N356U transistors can be used with the type of transistor NTE123AP / PN100 / 2N3904.

rangkaian kristal testerSkema rangkaian kristal tester

The mechanism of this crystal tester is very simple. If a good crystal is connected to the test lead, the oscillator will work, and an AC signal will be generated at Q1 emitter. This AC signal will flow through capacitor C3 and trigger the Q2 to light the LED indicator. The diode 1N4148 provide the back path for the AC signal. If the crystal is bad, the oscillator won’t work, and there is only DC voltage level at Q1 emitter. This DC voltage level won’t trigger the Q2 transistor since the capacitor C3 block any DC signal. You can use any high gain high frequency transistor for this crystal tester circuit, in case you can’t find exact transistor series as shown in the schematic diagram.

Rangkaian Kabel (lan) Tester.

Kabel Tester

Circuit of cable tester with a separate LED Will show open circuits, short circuits, reversals, earth faults, continuity and all with four IC's. The circuit comprises transmitter and receiver, the cable under test linking the two. The transmitter is nothing more than a "LED chaser" the 4011 IC is wired as astable and clocks a 4017 decade counter divider. The 4017 is arranged so that on the 9th pulse,the count is reset. Each LED will light sequentially from LED 1 to LED 8 then back to LED 1 etc. As the 4017 has limited driving capabilities, then each output is buffered by a 4050. This provides sufficient current boost for long cables and the transmitter and receiver LED's. The receiver is simply 8 LED's with a common wire.

rangkaian kabel testerSkema rangkaian kabel (lan) tester


Pinning IC 4017


With a good cable and all wires connected then LED 1 will light at both cable ends, followed in sequence by LED 2 ,3, 4 etc to LED 8, the sequence then repeating. If a 4 wire cable is used, it must be connected to use the common. The sequence would be LED 1,2,3,4 repeating with a delay as the 4 unused outputs are stepped through. To check for earth contact faults, the probe labeled "to earth connection" would be physically connected to a local earth. A wire that is earthing will dim or extinguish the LED's at both ends of the cable. An LED not lighting at the receiver, indicates a broken or open circuit.

The LED sequence of course is stepped through, as you know the transmitter "pattern" it is easy to tell the state of the cable by viewing the receiver pattern. The earth condition will only show up if the contact to earth is less than 1000 ohms, a better but more time consuming method for earth faults is to use a meter on the Megaohms range.


Source

Fuse|Sekring Elektronika.

Rangkaian Fuse Elektronika

Circuit of fuse (sekring) electronic designed to operate on 230V AC with an adjustable trip current. When the current through the load exceeds a level determined by the position of the wiper on the 1k wire-wound pot, this circuit cuts off the load immediately. If S1 is open, the range is approximately 300-650 mA, and 0.8-2A when it is closed.

rangkaian fuse|sekring elektronikaSkema rangkaian fuse|sekring elektronika

Note:
  • This circuit connects directly to 220-230V AC which can be lethal! Please do not attempt to build any of the circuits/projects unless you have the expertise, skill and concentration that will help you avoid an injury.
  • D1: 1N4001
  • T1: TIC225M
  • T2: BTA12-600CW

The key variable in the operation of the fuse is the voltage drop across the power resistor(s) which are connected in series with the load. This voltage drop is directly proportional to the current the load draws. When this current is low, the voltage across the resistors is also small and cannot trigger T1. At the same time the gate of T2 is fed from a little power supply built around a negative voltage regulator. T2 is conducting and the load is on.

If the current through the load then gets too high, so that the voltage created across the resistor(s) can trigger the gate of T1 through the 330R resistor and the pot: T1 starts to conduct, swiftly taking away all the current from the gate of T2. The voltage drop across T1 (MT1-MT2) will then be only 0.7 V and T2 will be firmly off. T1 stays this way all until the momentary (normally closed, "push-to-break") Reset push-button is pressed: this causes the current through T1 to drop below the hold level and forces this triac to turn off. Releasing the Reset button re-enables the current flow to and through the gate of T2, switching it on.

Thanks to www.zen22142.zen.co.uk

Monday, January 25, 2010

Rangkaian Op-Amp (LM741) Pre-Amp Mic

Op-Amp Pre-Amp Mic

This is the circuit of Op-Amp Microphone Preamplifier using a single power supply, this circuit suitable for dynamic or electret microphones. Nothing too special here. The Schematic is shown using a dynamic microphone, for use with an electret a pair of suitable biasing resistor is required to power the electret microphone.

rangkaian Op-amp pre-amp micSkema rangkaian op-amp pre-amp mic

Note:
  • use a capacitor with voltage 25volt or more
  • so that the sound produced maximal use supplay good voltage, with output of 18 volts max
  • If the desired strengthening of the different, you can change the value of R1 or R2

The design is a standard non-inverting design, the input is applied to the non-inverting input of the op-amp, which is pin 3 in most cases. The input impedance is 23.5k, the overall voltage gain is determined by R2 and R1according to the following formula:

Vo = (R2 / R1) + 1

With the values of R2 and R1 on the diagram of the voltage gain (for mid band, 1kHz) is approximately 23x or 27.2dB.

Pinning IC Op-Amp LM741


Friday, January 22, 2010

Rangkaian Indikator Suhu Air.

Indikator Suhu Air

This is a circuit that serves to indicate various levels of hot water in a tank. SW1 is a normally open press button switch which allows you to view the level of hot water in a hot water tank. When pressed the voltage difference at the junction of the thermistor and preset is compared to the fixed voltage on the op-amps non-inverting input. Depending on the heat of the water in the tank, the thermistors resistance will toggle the op-amp output to swing to almost full voltage supply and light the appropriate LED.

rangkaian indikator suhu airSkema rangkaian indikator suhu air


Note:
  • Op-Amp: LM324 or any quad opamp can be used or even four single op-amps.
  • R2-R5: 330ohm resistors, but Lower values give brighter LED output.
  • NTC1-4: Cold resistance was around 300K, hot resistance 15k. Alternative thermistors may be used with different resistance ranges, but the presets P1 to P4 must also be changed as well.
  • R7-10: only required if your thermistors resistance is several ohms at the hottest temperature.
  • P1 - P4: Chosen to match the resistance of the thermistor when cold.
  • R1 & R6: 100k Resistor

Masking tape was used to stick the bead thermistors to the tank. Wires were soldered and insulated at the thermistors ends. A plastic box was used to house the circuit. Battery life will probably be 4 to 5 years depending on how often you use the push switch, SW1.

Thermistors NTC1-4 should be spread evenly over the height of the tank. I placed NTC1 roughly 4 inches from the top of my tank and the others were spaced evenly across the height of the hot water tank. As hot water rises the lowest sensor indicates the fullest height of hot water and should be about 8 to 10 inches from the bottom of the tank.

With a full tank of hot water adjust P1-4 so that all LED's are lit. As hot water rises, the sensor at the bottom of the tank will be the maximum level of hot water. "Hot" can be translated as 50C to 80C the presets P1-4 allow adjustment of this range.

Source

Rangkaian Osilator Gelombang Sinus Variabel.

Osilator Gelombang Sinus Variabel (15 to 150kHz)

This is a circuit of sine wave oscillators covering a frequency range of 15 to 150kHz in four switched steps. Two conditions exist for a sinusoidal oscillator. Regenerative or positive feedback, and a closed loop gain of unity. The losses in the wien feedback circuit, are such that the open-loop gain of the amplifier must also exceed 3.

rangkaian osilator sinus variabelSkema rangkaian osilator sinus variabel


The circuit gain is provided by a FET type op-amp (LF351), but LF351 may be difficult to obtain, for a replacement you can use TL071CN or TL081CN. The Maplin order codes are RA67X and RA70M respectively. The wien network is a parallel combination of resistors and capacitors, in series with a series RC network. Regenerative feedback is applied from the op-amp output, to the serail RC input and continues. Stabilization is required to prevent the otherwise Uncontrolled oscillation from building up and becoming unstable.

There are two common methods of stabilizing a wien oscillator type. A thermistor with a NTC in the series leg of the feedback loop or an incandescent lamp (with a positive temperature coefficient) in the shunt leg of the feedback loop. The bulb used here is a 6V 60mA type Maplin code BT99H. A 12 Volt bulb rated 60mA or 40mA will also work. The feedback arrangement works as follows. As a bulb filament heats up its resistance increases. This will decrease the overall gain of the amplifier, as the output signal is fed back to the input.Similarly, if the output of the signal amplitude decreased Appearing at the bulb would be less, its filament resistance would drop and the gain would be increased. Therefore a stable output amplitude is produced. The 1k preset is adjusted for minimum distortion. Note that split supplies are used and a ganged 10k Potentiometer controls with a 10:1 frequency range.

Wednesday, January 20, 2010

3 - 6 volt Mini amplifier

Rangkaian 3 volt Mini amplifier

This is a mini 2W audio amplifier is suitable for small handheld radios and other portable audio gadgets. The amplifier circuit can be run from 3Volt. This Mercury is ideal for battery operated module. The potentiometer circuit can be used to control volume. Capacitor C1 and C2 are designed to filter supplyvoltage If the battery separator is used as operations offer source.For using batteries C1 and C2 are not required.

Rangkain Mini AmplifierSkema Rangkain 3 volt Mini Amplifier


TDA7052 is a mono output amplifier in 8-comng Head DI package (DIP). The device is designed primarily for battery-operated portable audio circuits. Features include TDA 7052, no external components needed, no switch-on or switch-off button sounds great overall stability and very low power consumption (quiescent current of 4 mA), low THD, it is not necessary any cooler and short-circuit proof.

Profit TDA 7052 is set internally at 40 dB. . Compensate for the reduction of output power due to low voltage TDA7052 uses Bridge-Tied-Load principle(BTL), which can provide power about 1 to 2 W RMS (THD = 10%), 8 ohm load to the power supply 6 V.

Rangkaian Gitar Reverb Efek

Gitar Reverb Efek

This is the circuit of guitar reverb circuit, it is suitable for use as a front-end to a guitar amplifier. This circuit features clipping indicators on the preamp and reverb recovery stages, allowing for the optimal gain settings.
Specifications
 rangkain gitar reverb efekSkema rangkain gitar reverb efek

The guitar input stage is a class A amplifier with adjustable bias. A 2N3906 PNP tranistor is used for a low noise design on this stage. The output of the preamp stage is sent to three places: the output mixer amp, the reverb driver amp, and the input clipping detector.

The reverb driver amp consists of a phase inverting push-pull circuit made from dual sections of a 5532 high quality audio op-amp. This provides a voltage swing of approximate twice the supply voltage to the reverb impedance matching transformer, allowing higher power transfer. The 100 ohm resistor is critical for insuring a clean drive signal, without it, the op-amps can saturate when driving the transformer, producing unwanted distortion.

The transformer matches the impedance of the driver amplifer to the reverb driver coil and allows a dual-phase driving signal to power a reverb coil with one side grounded. The transformer is a standard "70 volt" audio line transformer that is often found on PA systems. One reader reported having good results using a Mouser 42TU013 (1K to 8 ohm) transformer. If you can find a reverb tank with a high impedance coil driver, the transformer may be eliminated, the driver coil will require isolation from ground.

The output of the reverb tank is sent to the reverb recovery amp, it is also a 2N3906 class A low noise stage.

The mixer amplifier is a 2N3904 transistor biased for class A operation. It mixes the dry signal from the input preamplifer with the wet signal from the reverb recovery amp through two 10K resistors. The wet signal level is adjusted by a 10K Potentiometer.

The clipping detector stages receive inputs from the guitar preamp and the reverb recovery amp, they act in an identical manner. The 1458 op-amp is wired as a Comparator with a threshold that is near the high side of the allowable voltage swing on the associated 2N3906 preamp stage. If the transistor output exceeds this voltage, the 1458 output turns on, causing the 4011 one-shot pulse stretcher circuit to fire. The one-shot circuit activates the LED, and stays on long enough that even minor clipping on the amplifier causes visible blinking.

The power supply filter involves an RC filter between the DC input power and the bus VF1. VF1 drives the reverb driver, the output amp, and the clipping circuit. VF2 and VF3 are further filtered with their own RC filters, they provide isolated DC for powering the input preamp and reverb recovery amplifier stages.

Source

Rangkaian Efek Gitar Sederhana

Rangkaian Efek Gitar

For you who like to assemble their own or following electronic love is one of a series of simple Treble Booster

Treble Booster seldom used by guitarists, and if the only digunakanpun final choice, but there are also still likes the sound of guitar effects "Treble Booster" Screaming Bird Treble Booster was first introduced by the Electro-Harmonix was the era when 70 -- the company is producing guitar effects Screaming Bird Treble Booster. And in this current era of emerging many similar effects in treble booster which sell in the market, either a modified or an almost similar to the original sound.
rangkaian efek gitarSkema rangkaian efek gitar

Transistor 2n5133 is difficult to find in the market, these transistors are short data

Various
Si NPN Lo-Pwr BJT
V(BR)CEO (V)=18
V(BR)CBO (V)=20
I(C) Abs.(A) Collector Current=50m
Absolute Max. Power Diss. (W)=200m
I(CBO) Max. (A)=.05u
f(T) Min. (Hz) Transition Freq=40M
Package=TO-106
Military=N

if you are difficult to obtain these transistors use the following, may be an equivalent for this part but Please review the transistor datasheet for more details.
BC183
BC548
2N5172
KT315A
BC168
BC238
2N4967
BC209
2SC536

Friday, January 15, 2010

Microphone Komputer

Microphone Komputer

The sound card for a PC generally has a microphone input, speaker output and sometimes line inputs and outputs. The mic input is designed for dynamic microphones only in impedance range of 200 to 600 ohms. Lazar has adapted the sound card to use a common electret microphone using this circuit. He has made a composite amplifier using two transistors.

rangkaian microphone komputer Skema rangkaian microphone komputer

Transistor BC413B operates in common emitter to give a slight boost to the mic signal. This is followed by an emitter follower stage using transistor BC547C. This is necessary as the mic and circuit and battery will be some distance from the sound card, the low output impedance of the circuit and screened cable ensuring a clean signal with minimum noise pickup.

Transistor BC413
  • Collector Emitter Voltage VCEO 30 V
  • Collector Base Voltage VCBO 45 V
  • Emitter Base Voltage VEBO 5.0 V
  • Collector Current Continuous IC 100 mA
  • Power Dissipation at Ta=25ºC PD 350 Mw Derate Above 25ºC 2.8 mW/ºC
  • Power Dissipation at Tc=25ºC PD 1.0 W Derate Above 25ºC 8.0 mW/ºC
  • Operating and Storage Junction TJ, Tstg ºC - 55 to +150


Transistor BC547C
  • Collector-Base Voltage VCBO (IE = 0) 50 V
  • Collector-Emitter Voltage VCEO (IB = 0) 45 V
  • Emitter-Base Voltage VEBO (IC = 0) 6 V
  • Collector Current IC 100 mA
  • Collector Peak Current ICM 200 mA
  • Total Dissipation at Ptot TC = 25 oC 500 mW
  • Storage Temperature Tstg -65 to 150 oC
  • Operating Junction Temperature Tj Max. 150 oC

Rangkaian Audio Tone Control 2 Transistor

Audio Tone Control 2 Transistor

Audio tone control circuit based transistors on these provides a maximum cut and boost of around 10dB at 10K and 50Hz.
audio tone control  2 transistorSkema rangkaian audio tone control 2 transistor


The first BC109C transistor is acting as a buffer. It provides the circuit with a high input impedance, around 250k has a voltage gain of slightly less than unity. As the Baxendall tone control circuit is a passive design, all audio frequencies are attenuated. The position of the controls and reactance of the capacitors alters the audio response. The last transistor provides a slight boost of about 3x. The output is designed to feed an amplifier with input impedance of 10k to 250k. Both tone controls should be linear type Potentiometers.


quick Data Transistor BC109C

Low current max. 100 mA
Low voltage max. 45 V
Collector-base voltage open emitter 30 V
Collector-emitter voltage open base - 20 V
Peak collector current - 200 mA
total power dissipation Tamb £ 25 °C - 300 mW
DC current gain (hFE ) IC = 2 mA; VCE = 5 V 200 - 800
transition frequency IC = 10 mA; VCE = 5 V; f = 100 MHz 100 - MHz


Pining transistor BC109C


1 emitter
2 base
3 collector, connected to the case

Rangkaian 8Watt Audio Amplifier TDA2030

Audio TDA2030

This is a circuit of 8-watt audio amplifier IC TDA2030-based mono. When you use 4 ohm speakers then you get 14 watts output power, and around 8 watts if you use 8 ohm loudspeaker.

audio amplifier TDA2030Skema rangkaian audio TDA2030


Although the TDA2030 is capable of delivering 20 watts of audio power, I deliberately reduced the output to about 8 watts to 10 watts drive speakers. This is more than adequate for a smaller room. Input sensitivity is 200mV. Higher input levels naturally will give greater output, but no distortion should be heard. The gain is set by the 47k and 1.5k resistors. The TDA2030 IC is affordable and makes a good replacement amplifier for low to medium audio power systems. Incidentally, it is speaker efficiency that determines how "loud" the sound is. Speaker efficiency or sound pressure level (SPL) is usually quoted in dB / meter. A speaker with an SPL of 97dB / m will sound louder than a speaker with an SPL of 95dB / m.


Absolute Maximum Ratings IC TDA2030

Supply voltage ± 18 (36) V
Input voltage Vs
Differential input voltage ± 15 V
Output peak current (internally limited) 3.5 A
Power dissipation at Tcase = 90°C 20 W
Tj Stoprage and junction temperature -40 to 150 °C

IC TDA2030 pinning

Kit Amplifier TDA2030

Thursday, January 14, 2010

Rangkaian Pengendali Kipas Menggunakan Temparatur

Pengendali Kipas Menggunakan Temparatur

This circuit will trigger a relay when a preset temperature is reached. The circuit uses a NTC thermistor with a resistance of 47k at room temperature. The circuit is set in balance by adjusting the the 47k Potentiometer. Any change in temperature will alter the balance of the circuit, the output of the op-amp will change and Energize the relay. Swapping the position of the thermistor and 47k resistor makes a cold or frost alarm.

control kipas menggunakan terparaturSkema rangkaian Pengendali kipas menggunakan terparatur


At 25 degrees Celsius a NTC thermistor resistance is approximately 47k. The non-inverting op-amp inputs will then be Roughly half the supply voltage, adjusting the 47k pot should allow the relay to close or remain open. To calibrate the device, the thermistor Ideally needs to be at the required operating temperature. If this is for example, a hot water tank, then the resistance will decrease, one way to do this is use a multimeter on the resistance scale, read the thermistors resistance and then set the preset so that the circuit triggers at this temperature.

Please note that if the temperature then falls, the relay will de-Energize. Temperatures if the environment changes rapidly, then the relay may chatter, as there is no hysteresis in this circuit.

Hysteresis, allows a small amount of "backlash" to be tolerated. With a circuit employing hysteresis, there will be no relay chatter and the circuit will trigger at a defined temperature and require a different temperature to return to the normal state. Hysteresis can be applied to the circuit using feedback, try a 1Meg resistor between the op-amp output, pin 6 and the non-inverting input pin 2 to give the circuit hysteresis.

Friday, January 08, 2010

Rangkaian ALarm|Sirine Berbasis SCR

ALarm|Sirine Berbasis SCR

This is a simple SCR based burglar alarm circuit. Its features include automatic Exit and Entry delays - together with a timed Bell cut-off and Reset. It's designed to be used with the usual types of normally-closed input devices such as - magnetic-reed contacts - micro switches - foil tape - and PIRs.

rangkaian alarm|sirineSkema rangkaian alarm|sirine

SCR-based alarm circuit is It's easy to use. When you switch on the alarm - you have about 30 seconds to leave the building. When you return and open the door - the Buzzer will sound. You have about 30 seconds to switch off the alarm. If you fail to do so - the Siren will sound.

After about 10 minutes - the alarm will attempt to reset itself. If the trigger circuit has been restored - the attempt will be successful. But - if the loop is still open - the attempt will fail - and the alarm will re-activate. Of course - you can turn the Siren off at any time by switching off the alarm.

A conventional bell uses up to about 400mA. An electronic siren generally uses less. If you intend to draw a heavier current from either the Buzzer or Siren terminals - the SCR in question will need to be bolted to a metal heatsink - and the relay contacts may need upgrading.

If you do not want the timed "cut-off and reset" feature - leave out D5, D6, R11, R12, Q3, Q4, C6 and the relay.


Source

Control|Pengendali Relay MenggunakanTransistor

Control (Pengendali) Relay

The following series of functions to control the relay kutup. With an input signal greater than 0.3V pk-pk (100mV RMS) the positive half of the waveform will switch on transistor Q1, and Q2 and the relay. As the input signal switches to its negative transition, Q1 will switch off, but the base current in using-multimeter-to-measure-transistor.html">transistor Q2 continues to flow via the C2, so Q2 and hence load relays remain on. This will happen for any ac signal within 50 to 1000Hz. R1 prevents excessive base current flowing in transistor Q2, if required a series resistor of 100 ohms can be included with C1 to reduce excessive current flow, though this may decrease sensitivity.

rangkaian control (pengendali) RelaySkema rangkaian control (pengendali) Relay


C2 has a dual purpose; as well as smoothing the input signal, it adds a delay to the on / off operation. The delay is dependent on the value of C2 and the coil resistance of the relay. Instead of a relay, a LED and series resistor of 1k could be used instead, however the relay has the advantage of being able to switch large loads on and off. C2 has a dual purpose; as well as smoothing the input signal, it adds a delay to the on / off operation. The delay is dependent on the value of C2 and the coil resistance of the relay. Instead of a relay, a LED and series resistor of 1k could be used instead, however the relay has the advantage of being able to switch large loads on and off.

Pembanding Tegangan Menggunakan Op-Amp

Rangkaian Pembanding Tegangan

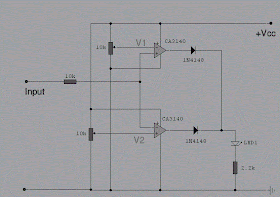
This following project serves to compare whenever the input voltage differs from two defined limits, V1 and V2. This circuit will provide an indication whenever the input voltage differs from two defined limits, V1 and V2. The supply voltage, Vcc must be higher than the highest input voltage by at least 2 volts. One application here is to monitor a 12V car battery. V1 could be set to 14V and V2 to 11V thus giving an indication of over charge or a weak battery.

rangkaian pembanding teganganSkema rangkaian pembanding tegangan

The CA3140 op-amps are used to advantage as they have very little output offset voltage and can switch down to near 0volts. If any other op-amp is used such as CA741 or LF351 then it will be necessary to have an offset null control. This is just a 10k preset pins contacted between 1 and 5, the wiper connected to the negative supply rail op-amps or 4 pins. With this circuit the op-amp either will light the LED if the input voltage goes out of limits, the two 1N4148 diodes forming an "AND"-gate at the output. The input voltage to be Monitored is fed via a series 10k resistors to inputs of both op-amps. If the input voltage is greater than the limit set by V1 then the CA3140 will swing its output to almost the full supply voltage and light the LED. Similarly, if the input voltage is less than the limit defined by V2 then this op-amp will swing towards Vcc and light the LED.

Thursday, January 07, 2010

Rangkaian Booster TV Sederhana

Rangkaian Booster TV

This is circuit that can be used to strengthen the RF signals from a television antenna work at UHF frequencies in the range 450-800MHz. It has a gain of around 10dB and is suitable for boosting weak TV signals

rangkaian booster TVSkema rangkaian booster TV sederhana


The tuned circuit comprising the 15nH inductor and 2.2pF capacitor resonate in the center of the UHF band. The 2.2pF capacitor may be Exchanged for a 4.7pF or a Trimmer capacitor of 2-6pF to improve results. The approximate frequency response is shown below. N.B. This is a simulated response using the TINA program produced by using a swept input 20uV swept over the frequency range 400-800MHz. Output was measured into a 1k source and the frequency generator has a 75ohm impedance.

The coil is half a turn of 18-20 SWG copper wire bent around a half inch drill bit. This ensures a low Q and therefore broad tuning. High frequency work requires special construction techniques to avoid instability (unwanted oscillations) caused by feedback from output to input. Veroboard is not suitable for this project as the capacitance between tracks is around 0.2pF. A better approach is to use tag-strip or a PCB. The circuitry should be enclosed in a metal case and a screen made between input and output. As the transistor is used in common base mode, its low input impedance is a good match for 50-75 ohm coax cable, whilst at the same time providing full voltage gain to the upper frequency limit of the device. The 15nH inductor load, having almost a short circuit impedance at DC, has an impedance of 56ohms at 600MHz. This inductance and 2.2pF capacitor form a tank circuit at the transistors collector, providing maximum gain at resonance.

Tuesday, January 05, 2010

Rangkaian Pemancar TV|Video Sederhana

Pemancar TV|Video PAL

The following is a series of simple TV transmitter using negative using sound modulation and PAL video modulation. This is suitable for countries using TV systems B and G.

rangkaian pemancar TV|VideoSkema rangkaian pemancar TV|Video sederhana


Note:
This circuit will be illegal in some countries

The frequency of the transmitter lies within VHF and VLF range on the TV channel, however this circuit has not been tested at UHF frequencies. The modulated sound signal contains 5.5-6MHz by tuning C5. Sound modulation is FM and is compatible with UK System I sound. The transmitter however is working at VHF frequencies between 54 and 216MHz and therefore compatible only with countries using Pal System B and Pal System G.

Inductor L1 can be made by wire email (24SWG) 4 convolution with 6mm diameter and T1 can be used with a radio frequency transformer internal capacitor. (Can be found on the old transistor radios).


List Componet of TV transmitter circuit
  • R1 = 10KOhm
  • R2 = 47KOhm
  • R3 = 15KOhm
  • R4 = 8.2KOhm
  • R5 = 47KOhm
  • R6 = 47KOhm
  • Variable resistor R7 = 1Kohm
  • R8 = 75Ohm
  • C1 = 10uF / capacitor 25Volt electrolik
  • C2 = 0.001uf / 10nF ceramic capacitor
  • C3 = 100nF
  • C4 = 10nf
  • C5 = 47pF (variable capacitors)
  • C6 = 10nF
  • C7 = 10pF
  • C8 = 27pF
  • C9 = 100nF
  • C10 = 470uF
  • C11 = 10nF
  • C12 = 220uF / 25Volt
  • Q1 = BC547 NPN transistor
  • Q2 = BC547 NPN transistor
  • T1 = T1 can use the radio frequency transformer with a built in capacitor. (Can be found on the old transistor radio board).
  • L1 = 4 turns of copper enamel 24SWG on 6mm diameter: with a plastic core

Rangkaian Teks|Huruf Berjalan Sederhana

Teks|Huruf Berjalan Sederhana

This is a running message display circuit wherein the letters formed by the LED arrangement light up progressively. Once all the letters of the message have been lit up, the circuit gets reset.

The circuit is built CD4017BC counter menggukan decades. One of the CD4017BE's features is its provision of ten fully Decoded outputs, making the IC ideal for use in a whole range of sequencing operations. In the circuit only one of the outputs remains high and the other outputs switch to high state successively on the arrival of each clock pulse. The timer NE555 is wired as a 1HZ astable multivibrator which clocks the IC2 for sequencing operations. On reset, output pin 3 goes high and drives transistor T7 to 'on' state. The output of transistor T7 is connected to letter 'W' of the LED word array and thus letter 'W' is illuminated.

rangkaian teks|huruf berjalan sederhanaSkema rangkaian teks|huruf berjalan sederhana


On arrival of first clock pulse, pin 3 goes low and pin 2 goes high. Transistors T6 Conducts and letter 'E' lights up. The preceding letter 'W' also remains lighted because of forward biasing of transistor T7 via diode D21. In a similar fashion, on the arrival of each successive pulse, the other letters of the display are also illuminated and finally the complete word becomes visible.

On the following clock pulse, pin 6 goes to logic 1 and resets the circuit, and the sequence repeats itself. The frequency of sequencing operations is control led with the help of potmeter VR1. The display can be fixed on a veroboard of suitable size and connected to ground of a common supply (of 6V to 9V) while the anodes of LEDs are to be connected to emitters of transistors T1 through T7 as shown in the circuit. The above circuit is very versatile and can be wired with a large number of LEDs to make an LED fashion jewelery of any design. With two circuits connected in a similar fashion, multiplexing of LEDs can be done to give a moving display effect

Rangkaian Senapan|Pistol Elektromagnetik

Senapan|pistol elektromagnetik

This is a miniature magnetic gun. when sakla 1 in press, it will propel a small slug about 1.5 meters high, 2.5 meters or horizontally. IC 555 is a timer in astable mode, sending approx. 10 ms pulses to decade counter IC2. IC2 is continually reset through R3, until pin 15 is taken low through the "Fire" button. IC2 then sequences through outputs Q1 to Q7, to feed power transistors TR1 to TR4, which fire electromagnets L1 to L4 in rapid sequence.

T1 is trafo step down 18 volts 1 amp A.C. When Rectified and smoothed, this provides 25.2 V DC for electromagnets L1 to L4. Resistors R4 drops 12 V to obtain a supply voltage low enough for IC1 and IC2.

senapan|pistol elektromagnetikSkema rangkaian senapan|pistol elektromagnetik


The electromagnets are wound on a 25 cm long, 3 mm dia. copper tube (available at hobby shops). Two "stops" may be cut from tin for each electromagnet, and 500 turns of approx. 30 SWG. enamelled copper wire wound between them. The electromagnets should be wound on a base of sellotape reversed, so that one may slide them on the copper tube. The slug (or "bullet") is a 3 cm long piece of 2 mm dia. galvanized wire, which should slide loosely inside the copper tube.

Most Crucial to the effectiveness of the gun are the setting of VR1 and the positions of electromagnets L1 to L4 on the copper tube (the values and measurements shown are merely a guide). Firstly, with L2 to L4 disconnected, VR1 should be tuned and L1 positioned for optimum effectiveness (place a wire inside the tube to feel how far the slug jumps with L1). Then L2 (now connected) should be positioned for optimum effectiveness (the slug will now exit the tube). Repeat with L3 and L4.

Electromagnets L2 to L4 were each found to substantially increase the range of the gun. In a forthcoming edition of SPE, the author will describe how readers may land a small projectile on Mars.

Friday, January 01, 2010

Rangkaian Driver (Penggerak) PlayBack TV

Driver (Penggerak) PlayBack TV

This is an efficient flyback driver for modern cylindrical rectified television flybacks. Frequency range can be increased using multiposition switch for other values of C3 capacitor, for example 2 nF for 80KHz-200000KHz, but didn't found flybacks with so high resonant frequencies, in addition with higher values of c3 , eg 200nF, 2uF the frequency will drop making possible the use of ignition coils, and rectified power transformers @50Hz to charge high voltage electrolitic caps at 300-400V).

rangkaian driver (penggerak) playback TVSkema rangkaian driver (penggerak) playback TV


The 555 is wired as an astable and the capacitor is charged only through the 4,7Kohm trimmer (notice the diode) and discharged only through the 2.2 Kohm trimmer, making the duty cycle full adjustable. The square wave is then feed in a totem pole made up of a 2N3904 and a 2N3906, which are cheap, and easy to find. The totem pole ensures the gate being charged and discharged very fast (approx 50nS). The IRF840 is a cheap reliable and powerful power mosfet, it has current capability of 8 A continuous and 32A pulse, 800V drain source voltage, protecting internal zener diode. There is a snubbing network to ensure that voltage spikes are kept low (unless the insulation of the transformer start to leak) protecting both transistors and 555 IC. 100 ohm is a compromise between decay time and voltage spike.

Note:
The flyback driven in this way can supply a significant current, aldough the heart fibrillation starts at 30mA I recommend caution to avoid painful arc-burns. The arc is a hot plasma, never operate the circuit in presence of flammable substances. Charging high voltage capacitors is a serious life threat, so if you arent unexperienced just draw arcs and no more This device when rectified generates static voltage that can be a little annoying

Rangkaian Kontrol Motor DC Sederhana

Kontrol Motor DC Sederhana

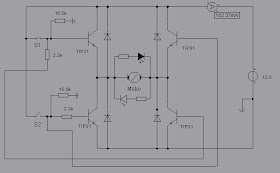
The following is a circuit that can be used to control the dc motor rotation direction. S1 and S2 are normally open, push to close, press button switches. The diodes can be red or green and are there only to indicate direction. You may need to alter the TIP31 transistors depending on the motor being used. Remember, running under load Draws more current.

Kontrol Motor DC SedehanaSkema Rangkaian Kontrol Motor DC Sederhana


This circuit was built to operate a small motor used for opening and closing a pair of curtains. As an advantage over automatic closing and opening systems, you have control of how much, or how little light to let into a room. The four diodes surriunding the motor, are back EMF diodes. They are chosen to suit the motor. For a 12V motor drawing 1amp under load, I use 1N4001 diodes.


Absolute Maximum Ratings Transistor TIP31

VCBO Collector-Base Voltage :
TIP31 40V
TIP31A 60V
TIP31B 80V
TIP31C 100V

Collector-Emitter Voltage :
TIP31 40V
TIP31A 60V
TIP31B 80V
TIP31C 100V

Emitter-Base Voltage 5 V
Collector Current (DC) 3 A
Collector Current (Pulse) 5 A
Base Current 1 A
Collector Dissipation (TC=25 C) 40 W
Collector Dissipation (Ta=25 C) 2 W
Junction Temperature 150 C
Storage Temperature - 65 ~ 150 C